- Products
- Blog
- Wholesale
- Stockists
- About
- Contact
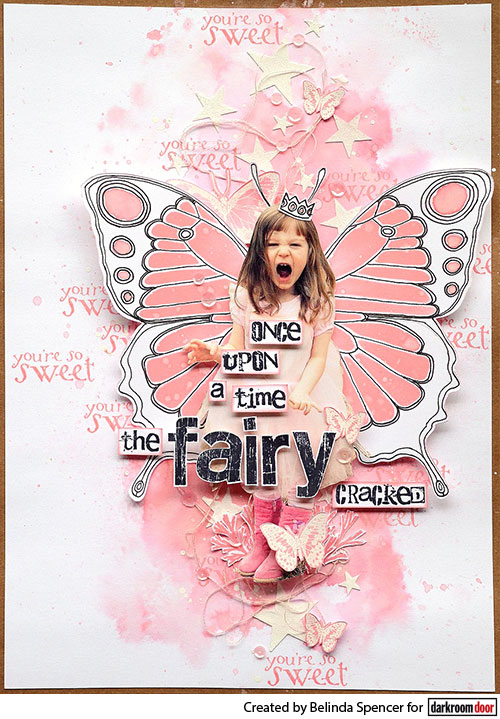
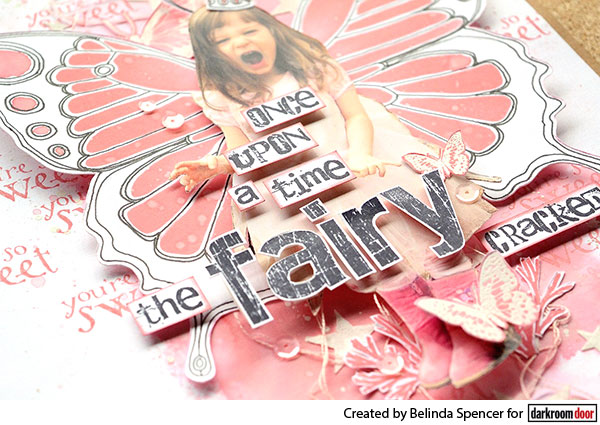
Hello Darkroom Door fans! Belinda here with you today to share a layout featuring the fabulous new Large Butterflies Stencil. I absolutely love the size of the large butterflies in this stencil and wanted to show how you can incorporate a beautiful set of wings on a scrapbook layout.
Instructions:
1. Use a couple of pieces of washi tape to secure the Large Butterfly Stencil in place on a piece of smooth white cardstock. Use an ink blending tool to apply Worn Lipstick Distress Oxide ink over the stencil taking care to hold the stencil in place securely. Flick a little water over the top to react with the oxide ink.
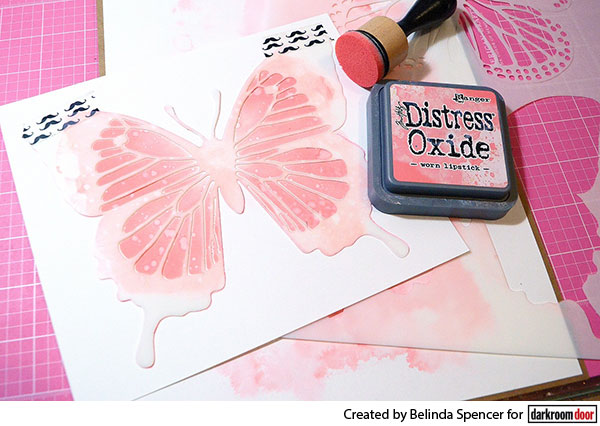
2. Fit the outer stencil over the inner butterfly stencil to make sure it is in the right place. Now remove the first stencil. Use a black journaling pen to draw around the edge of the stencil to create an outline. Remove the outer stencil. Fussy cut the butterfly. Add more doodling with the journaling pen.
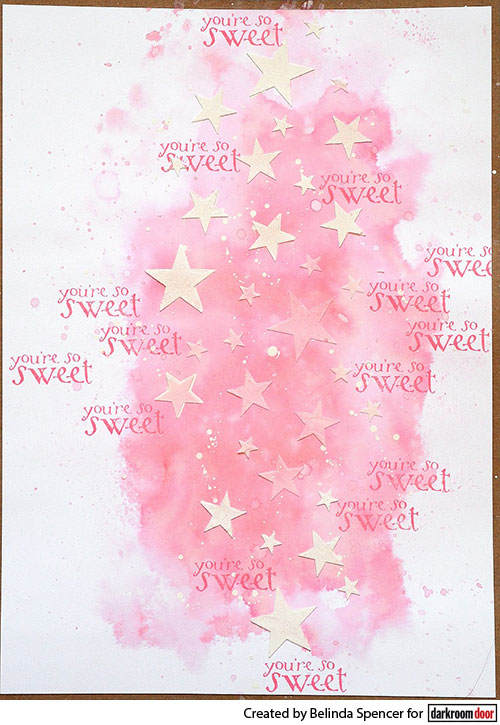
3. Create the background of your layout by spritzing it with water first. Squish the Distress Oxide ink onto a craft sheet and use a large soft wet paintbrush to pick up the colour and apply to the wet cardstock. Allow the colour to spread across the layout spritzing with more water to manipulate it. Dry with a heat gun. Flick a little more colour over the background and dry again. Swipe an extra piece of white cardstock through the remaining ink on the craft sheet so that there is no wastage and also to use in Step 7.
4. Place the Starry Night Large Stencil over the background and swipe some texture paste down the centre of the stencil using a palette knife. Set aside to dry. Use a white paint pen to highlight some of the stars. Stamp a sentiment several times over the background using the Worn Lipstick Distress Oxide.
5. Fussy cut a suitable photo to create a silhouette image. Remove the antennae from the butterfly prepared in Step One. Attach the antennae to the back of the photo head. Add the photo to the butterfly wings using 3D foam.
6. Add some messy pink thread on the layout background. Stick the butterfly person onto the background using 3D foam securing the thread in place.
7. Ensure the extra piece of cardstock that was swiped through the oxide ink is completely dry. Stamp some butterflies from the Butterflies Rubber stamp Set on this piece using embossing ink. Heat set with a fine white embossing powder. Fussy cut the butterflies and add to the layout.
8. Stamp some 'weeds' from the Seashells Rubber Stamp Set using the same Distress Oxide ink. Fussy cut and add to the layout around the feet of the photo.
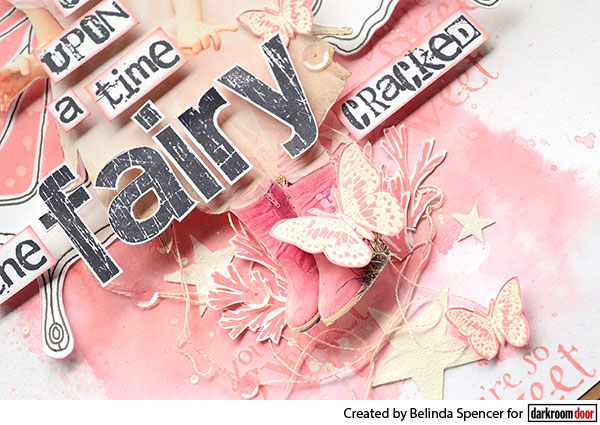
9. Create a title from the Alphabet Medley and Scratched Alphabet Rubber Stamp Sets Fussy cut and add to the layout along with some co-ordinating sequins.
Supplies used:
Darkroom Door Large Stencil - Butterflies
Darkroom Door Large Stencil – Starry Night
Darkroom Door Butterflies Rubber Stamp Set
Darkroom Door Seashells Rubber Stamp Set
Darkroom Door Sweet Treats Vol. 1 Rubber Stamp Set
Darkroom Door Alphabet Medley Rubber Stamp Set
Darkroom Door Scratched Alphabet Rubber Stamp Set
Distress Oxide Worn Lipstick
Distress Embossing Ink
Embossing Powder Fine White Detail
Embroidery thread
Sequins
I hope you have fallen in love with this stencil as much as I have. Have fun giving your own silhouette person some beautiful butterfly wings.
Thanks for stopping by the blog today.
Belinda
Large Butterfly Stencil Layout