- Products
- Blog
- Wholesale
- Stockists
- About
- Contact
Hi, It's Belinda Spencer here today with some cards using the new Crackle Texture Stamp!

Instructions:
1. Cut a piece of black cardstock 13.5cm x 21cm. Fold in half to form the card base.
2. Cut a piece of smooth white cardstock 10cm x 13cm. Apply the Crackle Background Stamp to this piece using Watering Can Archival Ink. Apply Hickory Smoke Distress Ink around the edges. Stick down on the card base.
3. Cut another piece of white cardstock 9cm x 12.5cm. Apply the Flower Garden Background Stamp using Jet Black Archival Ink. Apply Hickory Smoke and Black Soot Distress Inks around the edges. Stick down on the card
front.
4. Stamp the Crackle Texture Stamp on another piece of white cardstock using the Watering Can ink. Apply Hickory Smoke Distress Ink. Add a coat of Glossy Accents to this piece and set aside to dry.
5. Apply the Ornate Mirror Frame Stamp on smooth white cardstock using Distress Embossing Ink. Heat Set with Super Fine Details Silver Embossing Powder. Apply Black Soot ink over the top. Use paper towel to buff the frame and remove any ink from the embossed areas. Fussy cut the frame and stick down over the 'crackle' piece from Step 4. Add to the card front using 3D foam.
6. Apply two more coats of Glossy Accents to the 'mirror' part of the frame. Make sure you allow them to dry completely in between coats. You should end up with a lovely cracked mirror effect.

7. Stamp some butterflies and the sentiment on white cardstock using the Jet Black ink. Fussy cut and add to the card front.
Supplies used:
Darkroom Door Crackle Texture Stamp
Darkroom Door Crackle Background Stamp
Darkroom Door Flower Garden Background Stamp
Darkroom Door Ornate Mirror Frame Stamp
Darkroom Door Imperfection Quote Stamp
Darkroom Door Butterflies Rubber Stamp Set
Archival Ink: Jet Black, Watering Can
Glossy Accents
Embossing Powder Silver Super Fine Detail
Distress Ink: Black Soot, Hickory Smoke
Distress Embossing Ink
Instructions:
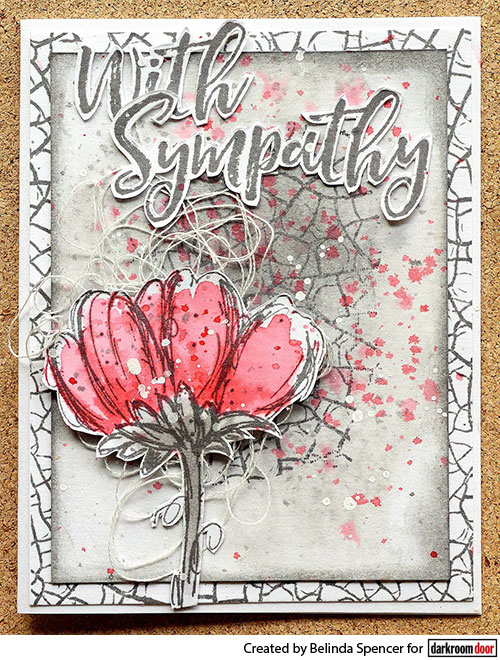
1. Cut a piece of white cardstock 13.5cm x 21cm. Fold in half to form the card base.
2. Cut another piece of smooth white cardstock 10cm x 13cm. Apply the Crackle Background Stamp to this piece using Watering Can Archival Ink. Stick down on the card base.
3. Cut another piece of white cardstock 9cm x 12.5cm. Spritz with a little Winter Grey Kaisermist and also some water. Blot away the excess with scrunched up paper towel. Dry with a heat gun. Add the Crackle Texture Stamp using Watering Can Archival Ink. Apply Hickory Smoke ink using an ink blending tool in the stamped area to create a slightly darker area. Also ink around the edges of this piece with the Hickory Smoke ink.
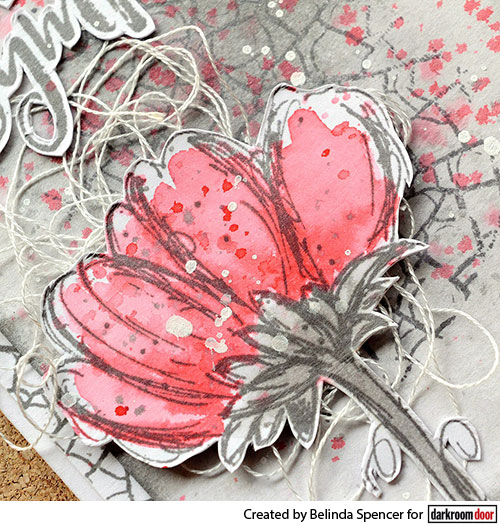
4. Stamp a flower from the gorgeous Fine Flowers Stamp Set on white cardstock using the Watering Can ink. Press Candied Apple and Hickory Smoke Distress Inks onto an acrylic block and spritz them (separately) with a little water. Use a soft wet paintbrush to paint the colours onto the stamped flower. Also add some flicks of colour to the flower and the crackle background. Dry the flower with a heat gun. Fussy cut the flower and add to the card front using 3D foam along with some messy embroidery thread. Use a white paint pen to add some splashes of white across the card front also.
5. Stamp your sentiment on white cardstock using the Watering Can ink. Fussy cut and add to the card.
Supplies used:
Darkroom Door Crackle Texture Stamp
Darkroom Door Crackle Background Stamp
Darkroom Door Brushed Sentiments Rubber Stamp Set
Darkroom Door Fine Flowers Rubber Stamp Set
Archival Ink: Watering Can
Distress Ink: Candied Apple, Hickory Smoke
Instructions:
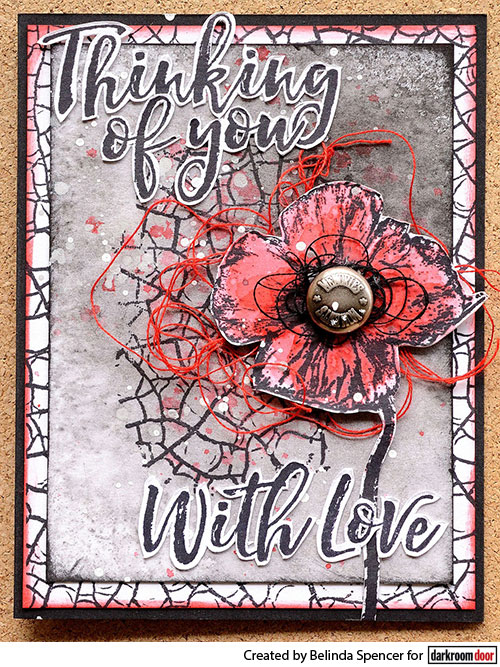
1. Cut a piece of black cardstock 13.5cm x 21cm. Fold in half to form the card base.
2. Cut a piece of smooth white cardstock 10cm x 13cm. Apply the Crackle Background Stamp to this piece using Jet Black Archival Ink. Apply Candied Apple Distress Ink around the edges. Stick down on the card base.
3. Cut another piece of white cardstock 9cm x 12.5cm. Spritz with a little water followed by Charcoal and Winter Grey Kaisermists. Blend with a little more water then blot away the excess with scrunched up paper towel. Flick some water over the top to create a water stained look. Dry with a heat gun. Apply the Crackle Texture Stamp over the top using the Jet Black ink. Stick down on the card front.
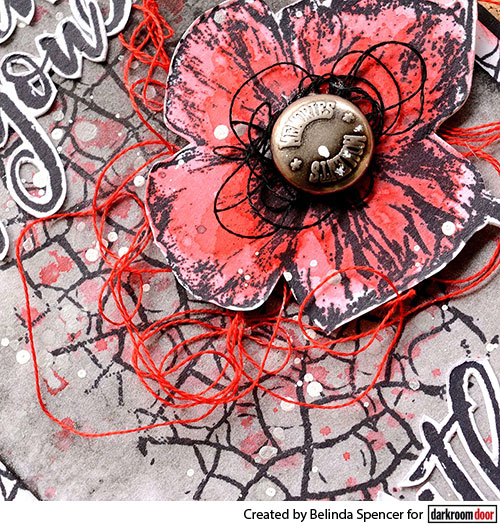
4. Stamp the Pretty Poppies Collage Stamp onto another piece of smooth white cardstock using the Jet Black ink. Press the Candied Apple and Black Soot Distress Ink pads onto an acrylic block and spritz each separately with a little water. Use a soft wet paintbrush to paint these colours onto the main poppy. Keep adding colour until you have the depth of colour required. Dry with a heat gun. Fussy cut and add to the card front using 3D foam along with some messy red embroidery thread. Add a little messy black embroidery thread to the centre of the poppy and glue on a metal button.
5. Use a white paint pen to add some white splashes over the front of the card. Stamp a sentiment using the Jet Black ink on white cardstock. Fussy cut and add to the card.
Supplies used:
Darkroom Door Crackle Texture Stamp
Darkroom Door Crackle Background Stamp
Darkroom Door Pretty Poppies Collage Stamp
Darkroom Door Brushed Sentiments Rubber Stamp Set
Darkroom Door Season's Greetings Rubber Stamp Set
Archival Ink: Jet Black
Distress Ink: Black Soot, Candied Apple
Thanks so much for stopping by!
Crackle Texture Stamp Cards