- Products
- Blog
- Wholesale
- Stockists
- About
- Contact
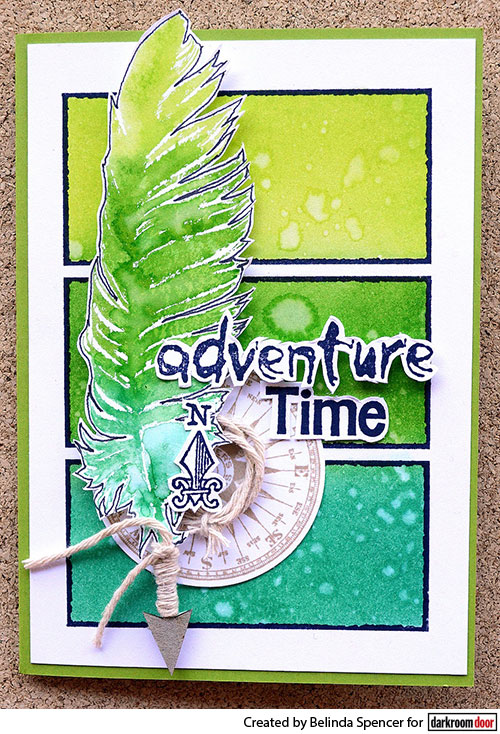
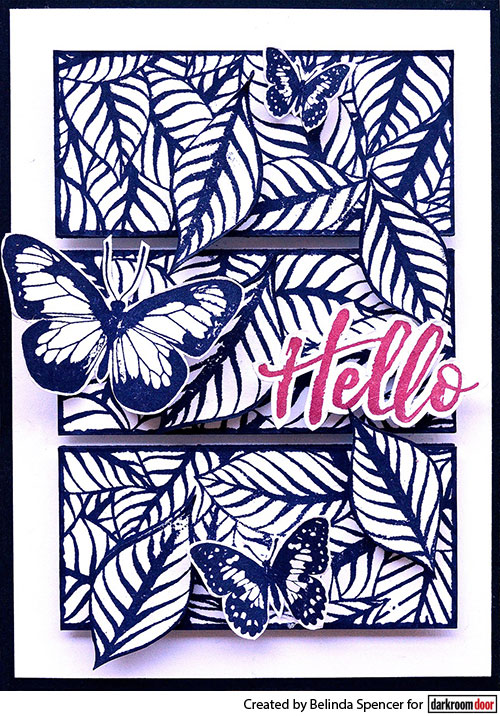
Hello Darkroom Door fans! It's Belinda here today to share a couple of cards with you featuring the Boxes 3 Up Frame Stamp. First up is a card where I have used my favourite watercolour effect technique followed by a card that is very bold and striking. This stamp really is very versatile.
Instructions:
1. Cut a piece of green cardstock 14cm x 20cm. Fold in half to form the card base.
2. Cut a piece of smooth white cardstock 9.5cm x 13.5cm. Stick down on the card base.
3. Apply the Boxes 3 Up Frame Stamp onto the card front using Jet Black Archival Ink.
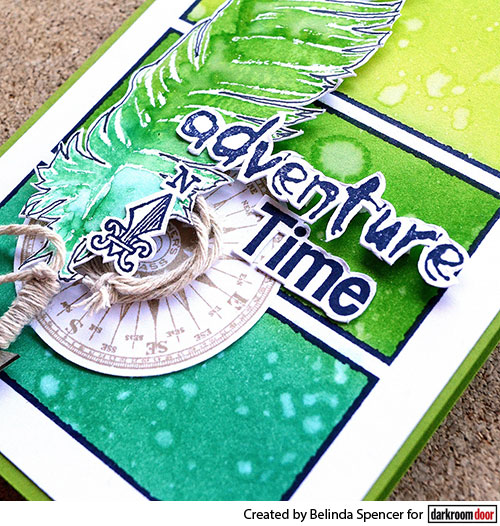
4. Use a little washi tape to hold the card in place on your work surface. Place the Boxes 3 Up Stencil over the top of the stamped image. You will find that they perfectly match. Secure in place with a little more washi tape. Grab a couple of pieces of thin paper such as printer paper. Use these to mask off two of the boxes at a time so you can individually ink each box. Apply Twisted Citron Distress Ink to the top box first using an ink blending tool. Next apply Mowed Lawn Distress Ink to the middle box and Lucky Clover Distress Ink to the bottom box. This gives a lovely ombre effect. Flick some water over the surface using your fingers and then leave to dry.
5. Place the feather from the Feathers Stamp Set onto an acrylic block. Place the acrylic block on top of the card front so that you can see the inked boxes underneath. This provides a guide for inking up the feather stamp. Use the same green Distress Inks to ink up the feather to co-ordinate with the boxes. Spritz the stamp with a little water and apply on a separate piece of smooth white cardstock. Use a soft wet paintbrush to blend out the colours a little. Dry with a heat gun and then use a fine black journaling pen to draw an outline around the feather. Fussy cut.
6. Glue a chipboard arrow onto the stem of the feather. Wrap some twine around the length of the arrow and tie off to secure.
7. Stamp the compass from the Sail Away Stamp Set onto the extra white card stock using Tree branch Archival Ink. Use a circle punch to cut out and then glue onto the card front. Add a little coil of twine to the centre of the compass image. Stick down the feather using 3D foam under the feather part.
8. Stamp the sentiment and the little 'north arrow'from the Sail Away Stamp Set using Jet Black Archival Ink. Fussy cut and add to the card front.
Supplies used:
Darkroom Door Boxes 3 Up Frame Stamp
Darkroom Door Boxes 3 Up Small Stencil
Darkroom Door Sail Away Rubber Stamp Set
Darkroom Door Feathers Rubber Stamp Set
Darkroom Door Party Time Rubber Stamp Set
Archival Ink: Jet Black, Tree Branch
Distress Ink: Lucky Clover, Mowed Lawn, Twisted Citron
Instructions:
1. Cut a piece of black cardstock 14cm x 20cm. Fold in half to form the card base.
2. Cut a piece of smooth white cardstock 9.5cm x 13.5cm. Stick down on the card base.
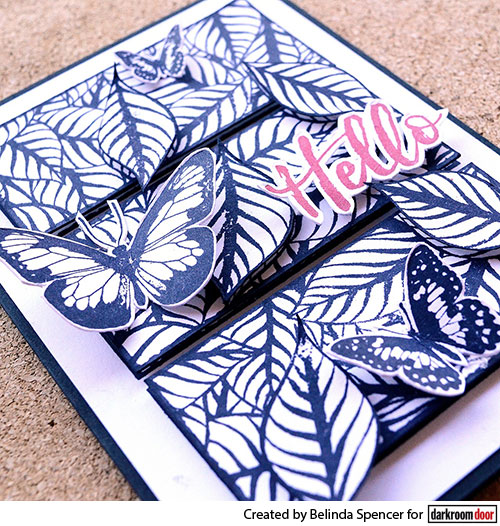
3. Apply the Boxes 3 Up Stamp to the card front using Jet Black Archival Ink taking care to centre it.
4. Apply the Boxes 3 Up Stamp again to an extra piece of smooth white cardstock using the same ink. Stamp the Fallen Leaves Background stamp over the top using the same ink. Cut out the individual boxes. Add to the card front using 3D foam.
5. Stamp the Fallen Leaves Background Stamp again on the extra white cardstock. Cut out some individual leaves and add to the card front using 3D foam.
6. Stamp some butterflies from the Butterflies Stamp Set onto the extra white cardstock using the Jet Black ink. Fussy cut and glue onto the card front.
7. Stamp a sentiment using Red Geranium Archival Ink. Fussy cut and add to the card front using 3D foam.
Supplies used:
Darkroom Door Boxes 3 Up Frame Stamp
Darkroom Door Fallen Leaves Background Stamp
Darkroom Door Butterflies Rubber Stamp Set
Darkroom Door Brushed Sentiments Rubber Stamp Set
Archival: Jet Black, Red Geranium
Thank you for stopping by the blog today to check out my projects. I hope you are feeling inspired to create your own projects combining the Boxes 3 Up Stamp and Stencil.
Cheers,
Belinda